Digital Products
How to Create a Digital Product Bundle: Step-by-Step Guide for Beginners
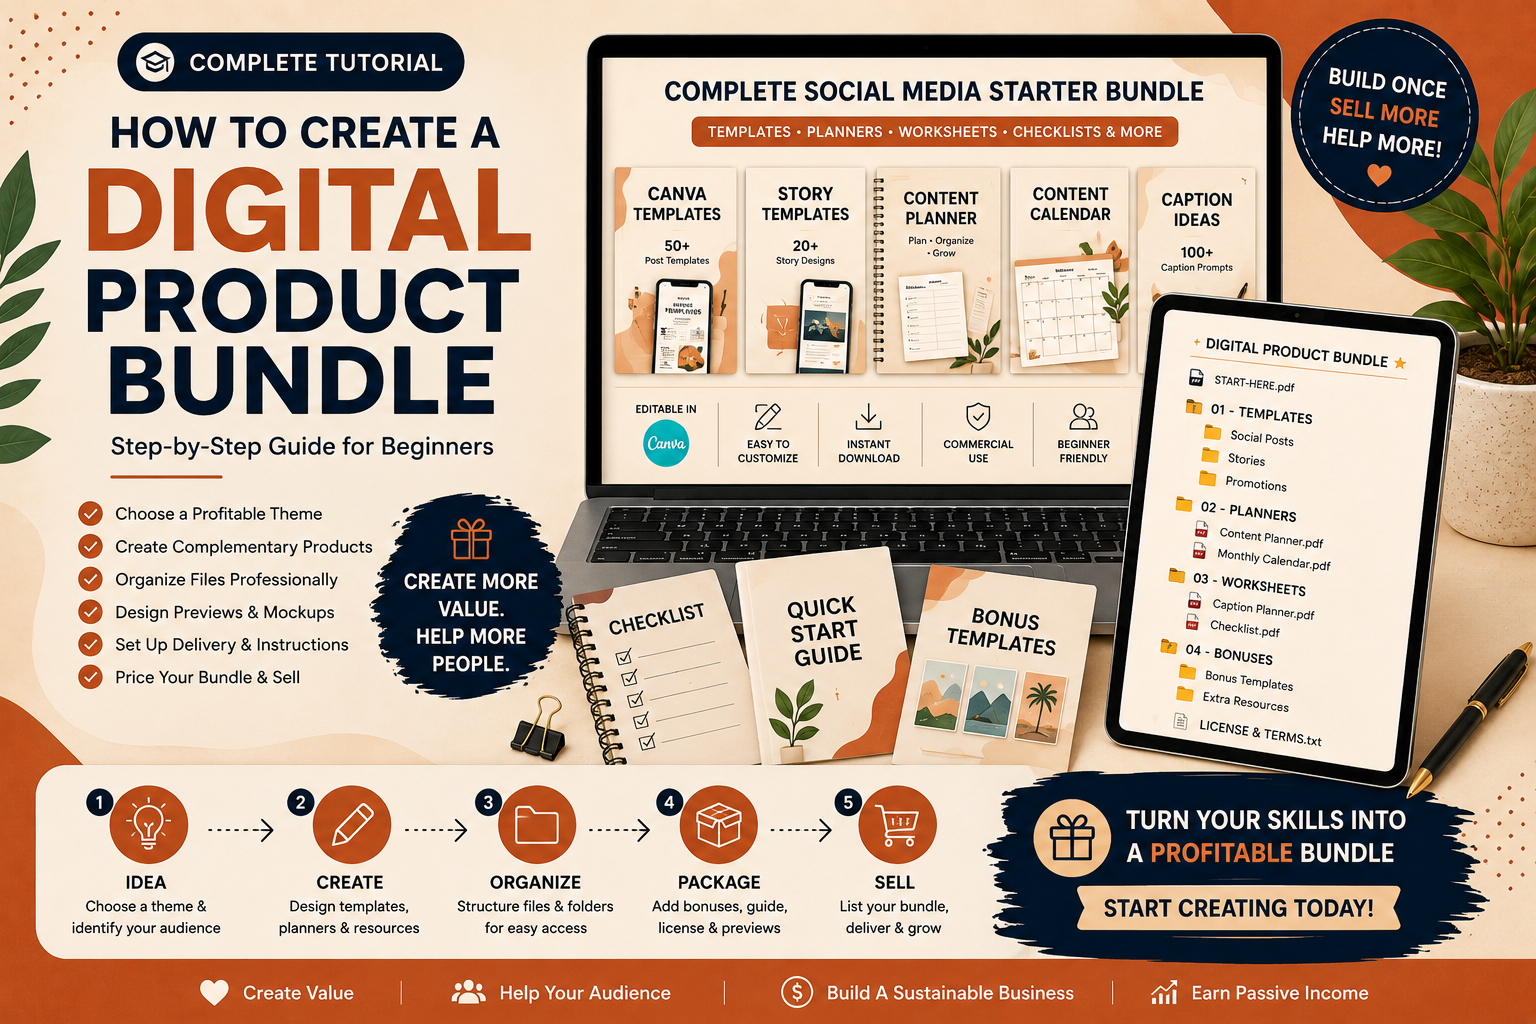
Learn how to create a valuable digital product bundle from scratch. This beginner-friendly guide explains how to choose a profitable theme, plan your bundle, create complementary products, organize files, design previews, set up delivery, test the customer experience and prepare your bundle for sale.
Creating a single digital product is a great way to start an online digital product business, but creating a well-planned digital product bundle can help you offer customers a more complete solution.
Instead of selling several unrelated files, a bundle combines products that work together around one specific topic, audience or problem.
For example, instead of selling a single social media template, you could create a complete social media bundle containing post templates, story templates, a content planner, caption ideas and a posting checklist.
The key is not simply adding as many files as possible. A successful bundle should feel organized, useful and intentional.
If you're completely new to digital products, start with our beginner's guide to creating and selling digital products before building your first bundle.
In this step-by-step tutorial, you'll learn how to create a digital product bundle from the initial idea to the final customer delivery package.
What Is a Digital Product Bundle?
A digital product bundle is a collection of related digital products sold together as one offer.
The products inside the bundle should normally have a clear relationship with each other.
Examples include:
- Canva template bundles
- Printable planner bundles
- Social media content bundles
- Business template bundles
- Teacher worksheet bundles
- Resume and career bundles
- Wedding planning bundles
- Small business starter kits
- Digital marketing bundles
- Productivity bundles
The customer should be able to understand the purpose of the bundle quickly.
A good bundle answers a simple question:
"What complete problem does this collection help the customer solve?"
Why Create a Digital Product Bundle?
Bundles can make your product catalog more useful because customers can purchase several related resources at once instead of searching for each item individually.
A bundle can also give you an opportunity to combine smaller products into a larger offer.
For example, imagine you already have these products:
- 10 Instagram templates
- 10 Instagram Story templates
- Content calendar
- Caption planner
Instead of keeping them completely separate, you could organize them into a larger product such as:
Complete Instagram Content Starter Bundle
The important point is that the products should have a logical connection.
Step 1: Choose a Specific Target Customer
Before creating the bundle, decide who you are creating it for.
A common beginner mistake is trying to create a product that is suitable for everyone.
Instead, choose a specific audience.
For example:
- New Etsy sellers
- Coaches
- Teachers
- Freelancers
- Small business owners
- Content creators
- Students
- Parents
- Real estate agents
- Beauty businesses
The more clearly you understand the customer, the easier it becomes to decide what belongs inside the bundle.
Step 2: Identify One Main Problem
After choosing the audience, identify a problem that your bundle will solve.
For example, a new small business owner may need help creating social media content.
Instead of selling one random template, you could build a bundle around the complete content creation process.
The bundle might contain:
- Social media post templates
- Story templates
- Content planner
- Content calendar
- Caption worksheet
- Posting checklist
Now every component supports the same overall problem.
This is much stronger than simply putting unrelated products into one ZIP file.
Step 3: Research Existing Products
Before spending hours creating your bundle, research the market.
Look at products that target a similar audience and analyze what customers are already being offered.
Pay attention to:
- Product names
- Number of included items
- Design style
- Product format
- Pricing
- Customer reviews
- Common complaints
- Frequently included features
- Frequently missing features
Don't simply copy another seller's product.
Use market research to discover opportunities to make your own product clearer, more useful or better organized.
Step 4: Plan the Bundle Before Designing
Don't open Canva and start creating random pages immediately.
Create a simple product outline first.
For example:
- Cover page
- Quick-start instructions
- Main templates
- Supporting worksheets
- Bonus resources
- Usage information
Then decide exactly how many items you want in each section.
This prevents the project from becoming disorganized and makes it easier to calculate the actual amount of work involved.
Step 5: Choose Complementary Products
Every item inside your bundle should have a reason for being there.
Ask yourself:
"Will this product help the customer use the other products more effectively?"
If the answer is no, consider leaving it out.
For example, a social media bundle could contain templates, a content calendar and a planning worksheet because all three support the same workflow.
Adding a completely unrelated printable simply to increase the file count may make the bundle feel less professional.
Step 6: Decide What Makes the Bundle Special
Your bundle needs a clear reason for customers to choose it.
This could be:
- A specific niche
- A particular design style
- A complete workflow
- A large number of useful templates
- Beginner-friendly instructions
- Multiple formats
- Useful bonus resources
- A problem-specific solution
For example, "100 Random Canva Templates" is fairly generic.
Something like "100 Canva Templates for New Coaches" immediately communicates a specific audience and purpose.
Step 7: Create the Main Products First
Start with the most important components of the bundle.
Don't spend most of your time designing bonus materials before the main product is complete.
A useful workflow is:
- Create the core product.
- Test the core product.
- Create supporting resources.
- Create bonuses.
- Prepare instructions.
- Organize the final package.
This keeps your priorities clear.
Step 8: Keep the Design Consistent
If your bundle contains multiple products, they should feel like part of the same collection.
Use consistent:
- Colors
- Typography
- Spacing
- Icons
- Illustration style
- Page structure
- Branding
Consistency makes the bundle look more professional and easier for customers to understand.
Step 9: Create Useful Variations
If your bundle contains templates, variations can significantly increase its usefulness.
For example, a social media bundle might include:
- Educational posts
- Promotional posts
- Quote posts
- Testimonial posts
- Announcement posts
- Question posts
- Tips and tricks
- Call-to-action designs
Each variation should serve a different purpose rather than being a minor color change of the same design.
Step 10: Add a Quick-Start Guide
A simple instruction guide can make your bundle feel much more complete.
Your guide can explain:
- What is included
- How to access the files
- How to edit templates
- How to replace images
- How to customize colors
- How to download finished files
- Where to get help
Don't assume that every customer understands how your product works.
A short, clear guide can save both you and your customers time.
Step 11: Organize Your Files Professionally
File organization is especially important for large digital bundles.
A messy folder can make a good product feel difficult to use.
Digital-Product-Bundle/
│
├── START-HERE.pdf
├── ACCESS-INSTRUCTIONS.pdf
│
├── Templates/
│   ├── Social-Posts/
│   ├── Stories/
│   └── Promotions/
│
├── Planners/
│   ├── Content-Planner.pdf
│   └── Monthly-Calendar.pdf
│
└── Bonuses/
    ├── Checklist.pdf
    └── Bonus-Templates.pdf
Use simple and descriptive file names so customers can identify files without opening every folder.
Step 12: Separate Main Products and Bonuses
Bonuses should complement the main product rather than making the product confusing.
For example, if the main product is a social media template bundle, useful bonuses could include:
- Content planning worksheet
- Caption planner
- Posting checklist
- Bonus social media templates
This gives the customer additional value while keeping the main purpose of the bundle clear.
Step 13: Test Every File
Before publishing the bundle, open every important file and test the customer experience.
Check:
- Are all files present?
- Do the files open correctly?
- Are links working?
- Are template links correct?
- Are PDFs readable?
- Are images high quality?
- Are there spelling mistakes?
- Are file names understandable?
- Are instructions clear?
Testing is one of the most important steps because customers should receive exactly what your product listing promises.
Step 14: Test the Customer Journey
Don't only test individual files. Test the complete journey.
Imagine that you've never seen your product before.
Ask yourself:
- Can I understand what I purchased?
- Can I find the instructions?
- Can I access the files?
- Can I edit the templates?
- Can I download the finished files?
- Do I understand what I am allowed to do with them?
If you get confused anywhere, improve that part before publishing.
Step 15: Create Professional Preview Images
Your product preview is often the first thing potential customers see.
Don't simply upload one screenshot of a folder containing files.
Instead, create a visual presentation showing what the customer will actually receive.
Your preview images can show:
- Main product pages
- Template variations
- Bonus resources
- Different file types
- How the product works
- What is included
Use clean mockups and readable text so customers can understand the product quickly.
Step 16: Create a Clear Bundle Name
The product name should communicate the audience, product type and benefit where possible.
For example:
Small Business Social Media Starter Bundle
is clearer than:
Ultimate Mega Bundle Vol. 1
A good name makes the product easier to understand and can also help with search visibility on marketplaces and search engines.
Step 17: Decide What the Bundle Includes
Make a complete inventory of your product.
For example:
- 50 social media templates
- 20 story templates
- 1 content calendar
- 1 planning worksheet
- 10 bonus templates
- Quick-start PDF
Be specific about what the customer receives.
A clear list reduces confusion and makes the offer easier to evaluate.
Step 18: Choose a Pricing Strategy
Once the bundle is complete, decide how you want to position it.
Consider:
- Your target customer
- The size of the bundle
- The quality of the design
- The usefulness of the resources
- Competitor pricing
- Your product positioning
For a deeper explanation of pricing, read our guide: How to Price Digital Products.
Don't assume that a larger number of files automatically justifies a higher price. A focused bundle that solves a specific problem can be more valuable than a huge collection of unrelated files.
Step 19: Consider Creating Multiple Versions
You can create different versions of the same product idea.
Basic Bundle
Contains the essential resources for customers who want a simple solution.
Standard Bundle
Includes more templates and supporting resources.
Premium Bundle
Includes the complete collection, bonuses and additional resources.
This approach can help you serve customers with different needs and budgets.
Step 20: Prepare the Delivery File
If you're selling your bundle through a digital marketplace or your own website, prepare a simple delivery package.
For example:
START-HERE.pdf
ACCESS-INSTRUCTIONS.pdf
LICENSE.txt
BONUS/
MAIN-FILES/
If your main product is delivered through a template link, the PDF can explain how the customer should access the template.
Always test the final delivery package before publishing it.
Step 21: Add Usage Instructions
Customers should understand how they can use the product.
Your instructions can explain whether the product is intended for:
- Personal use
- Commercial use
- Business use
- Client projects
If you provide a license or usage terms, make sure they accurately describe what customers can and cannot do with the product.
Step 22: Check Third-Party Content and Licensing
This step is particularly important for commercial digital products.
If your bundle contains fonts, photographs, graphics, illustrations, icons, templates or other assets created by someone else, verify that you have the appropriate rights for your intended use.
Don't assume that an asset being available online automatically means you can redistribute it as part of a digital product.
If you're using content from a design platform such as Canva, review the current license terms that apply to the content and the way you intend to distribute your product.
When possible, use original assets or assets with licensing that clearly permits your intended commercial use.
Step 23: Write a Strong Product Description
Your product description should explain the value of the bundle rather than simply repeating its name.
A useful description can contain:
- Who the bundle is for
- What problem it solves
- What is included
- How it works
- Important requirements
- Usage information
- Frequently asked questions
Keep the information easy to scan by using headings and bullet points.
Step 24: Create a Free Sample
A small free sample can be an effective way to demonstrate the quality of a larger bundle.
For example, if your paid bundle contains 50 templates, you might provide a small selection as a free resource.
You can explore our free digital resources for examples of how free resources can complement a paid digital product.
The free resource should be genuinely useful while making the difference between the free and paid products clear.
Step 25: Connect the Bundle With Your Content
Your blog posts and tutorials can help potential customers discover your digital products.
For example, our Canva template creation tutorial explains how to create editable templates, which can become individual products or components of a larger bundle.
You can also use educational content about digital product pricing to decide how to position your bundle.
A simple content structure can look like:
Blog → Tutorial → Free Resource → Paid Bundle
This allows visitors to move naturally from learning to trying and eventually purchasing.
Explore a Digital Product Example
If you want to see how a digital product can be packaged and presented as an online offer, you can also explore this external digital product example:
View the digital product example
Use examples like this for inspiration, but create your own original product, branding and content rather than copying another seller's work.
Common Digital Bundle Mistakes
Adding Random Products
Don't add unrelated files simply to make the bundle look bigger.
Focusing Only on Quantity
"500 files included" sounds impressive, but quantity doesn't automatically equal usefulness.
Poor Organization
A customer should not have to search through hundreds of files to find one resource.
No Instructions
Even simple products benefit from clear instructions.
Weak Preview Images
If customers can't understand what they're buying from the preview, they may leave before reading the description.
Ignoring Licensing
Always verify the rights associated with third-party assets before distributing a commercial product.
Making the Bundle Too Broad
A focused bundle usually has a clearer value proposition than a collection designed for everyone.
Digital Product Bundle Checklist
Before publishing your bundle, use this final checklist:
- ✓ Target customer identified
- ✓ Main problem identified
- ✓ Market research completed
- ✓ Bundle structure planned
- ✓ Main products created
- ✓ Supporting resources added
- ✓ Useful bonuses created
- ✓ Design style is consistent
- ✓ Files organized
- ✓ Instructions prepared
- ✓ Every file tested
- ✓ Links tested
- ✓ Preview images created
- ✓ Product description written
- ✓ Pricing researched
- ✓ Licensing checked
- ✓ Delivery process tested
Final Thoughts
A successful digital product bundle is not simply a large collection of files.
The strongest bundles are built around a specific customer and a specific problem.
Start by identifying your audience, research the market and plan the bundle before designing anything. Then create complementary products that work together, organize everything professionally and test the complete customer experience.
Pay attention to presentation as well. Professional preview images, clear instructions, useful bonuses and an easy delivery process can make a significant difference in how customers perceive the product.
Pay particular attention to usefulness rather than file count.
A carefully designed 20-item bundle that solves a real problem can be more valuable than a 500-item collection filled with unrelated resources.
Once you've created one successful bundle, you can use the same workflow to create additional products for related audiences and build a complete digital product catalog.
Start small, solve one clear problem, make every item useful and build your bundle around the customer's actual needs.
Ready to explore more digital resources?
Explore free resources, tutorials and digital products from DigiDown.